 |
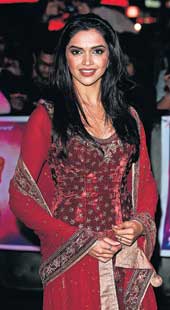
The two blockbusters of the season — namely Om Shanti Om and Saawariya — have each brought to the world of hair and make-up their own brand of retro chic, be it in the underplayed Waheeda Rahman-reminiscent head-to-toe covered visage of the delicately featured Sonam Kapoor, or in the dramatically presented doe eyes of Deepika Padukone.
OSO seems to have come out tops in the popularity department, however, as the majority of young brides/party goers are opting for the “Shanthipriya” brand of retrocession, brought to the screen by Deepika. Her intrinsic elegance and lissome frame were used to maximum advantage while recreating the backcombed/bouffant hairstyles, outer eye make-up, and form-enhancing ensembles, so evocative of the 70s. The look, so adeptly yanked out of the past and dusted over with a contemporary flourish, will enjoy a much-in-demand status for a while to come.
This brings me to the question of the week:
I loved the look Deepika Padukone sported in OSO. I want to sport it at a party I am throwing on my first wedding anniversary this January. How do I go about it? I am dusky like she is, but not as tall. I am very slim. Is getting that look possible?
It is very possible. In fact, the high bouffant styles will add a couple of inches to your height, if that’s what you want.
Shanthipriya’s overall presentation, despite it seeming an over the top (OTT) one, was in fact a dewy luminescent subtly-worked-on piece of make-up magic! The lighter shades that were used on the cheeks and lips proved an engaging contrast for the heavy eye make-up. Below are a few tips to get you going on a retro train run of your own.
Base: Blend with care
1. Cleanse, tone and moisturise.
2. Dot a MAC 40 or 45 foundation over your face. This is probably what is closest to your dusky complexion. Do a test, checking it out in natural light.
3. Cover dark circles/hollowed eyes, with a cover stick that is a shade lighter than your foundation and make sure just a hint of the product is used. Too much coverage can have an opposite effect to what is desired and your eyes will end up looking dry, lined and submerged in shadows.
4. Dust face with a translucent powder, paying special attention to the T-zone.
Eyes: Work them!
1. Use a shimmer-based ivory highlighter on both brow bones and blend well.
2. Pick any three dominant colours used in your ghagra/lehnga/sari. Apply the lightest shade all over the lids, then the darker shade in the crease, working towards the outer areas under the eyebrows, and then the darkest shade in a triangular shape towards the outermost area of the eyes.
3. A contrasting colour of your choice can dot the area just above the lash line — this will update the whole effect!
5. Draw a liquid liner (colour of your choice, the more experimental the better) all the way from the inner corner of the eye to about a quarter inch past the actual area where the eyelid ends. This will make the eye look larger than it actually is.
6. Draw a more refined/defined, line from the inner corner of your lower lid and work towards meeting the line drawn on the top. You can really use your imagination here — both with colours and technique — to elongate the line or single wing it!
7. Mascara the lashes liberally giving time for drying between applications.
Cheeks: The look is healthy and fresh
1. Suck cheeks in and then, very sparingly dab on orange-toned blusher with highlighter on the cheekbones.
2. Dab on lightly, a bronze translucent powder over the blusher on cheeks.
Lips: Full and sensuous
1. Outline lips with a light almost invisible shade of lip pencil.
2. Dab on a glossy/flat nude shade that complements the overall tone of your outfit.
Hair: Give it your best shot
Take the asymmetric side fringe, backcomb it slightly then plaster it down across the forehead with an upsweep that has ringlets cascading down delicately. This is the hot hit of the season! If the ringlets prove too complicated, a high ponytail will do nicely instead.
1. Wash your hair the day before you want to have it set. Silky hair is not conducive to upsweep styling.
2. Take a section of hair, first from the crown to the top of the ears.
3. Taking small sections of hair that has been dabbed with an ultra-hold styling product, work the hair around the heated tongs.
4. Keep doing this section by section till the hair that is behind the ear is teeming with ringlets.
5. Now gently make an asymmetrical side parting with the hair that is to the front of the ear to ear section, back comb the fine diagonal sections from the parting that you have taken. Remember to mist over with lacquer, section by section. The hair on the other side of the parting is taken in sections and backcombed too.
6. Mould the hair in front of the ear to ear section neatly across the forehead and secure with pins behind ears.
7. Now take the ringlets and beginning with the topmost section, start pinning with tiny bob pins, bringing the curls toward the centre. Spray every time you do this.
8. Arrange hair with three red carnations or better still any one of the glittering hair accessories suited to your outfit!
Remember, retro chic is all about using contemporary products to create an aura of the days-gone-by look. Pulling out old make-up that was used 10 years ago is just not on. Doing so can have you looking like a distortion in the time continuum!!!
Send your beauty queries to t2@abpmail. com