 |
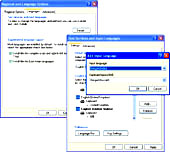
| The dialogue boxes that pop up while using the new pack |
With the advent of Windows XP Service Pack 2, you can now look beyond English while communicating via emails
How many times have you tried to write an email to your old grandmother or aunt in her native language only to be disappointed because you did not have the proper software for Indian languages. Even if you did there was no guarantee that the recipient’s computer would recognise the type and print it correctly or display it properly on the screen. You must have run pillar to post trying to get a program to type in Bengali, Gurumukhi or Gujarati only to find severe limitations with the product. Let alone email, the files could never be opened in another computer. And even if they did it would appear garbled on the screen.
Very few people know it but with the advent of Windows XP Service Pack 2 the situation has changed completely. You can now type in the language you want to and even send email to another computer running XP or Windows 2000 or a version of Linux without any problem. You do not have to convert your text to an image so that another person can read it. The Indian languages now supported in Service Pack 2 are Hindi, Bengali, Assamese, Marathi, Tamil, Kannada, Gujarati, Telugu, Malayalam, Punjabi (Gurumukhi), Konkani and recently Nepalese. More Indian languages will be added as Windows improves.
Support for Unicode
All this has been made possible by the support for Unicode in Windows. Unicode is a standard that allows all text and symbols in all known languages in the world to be displayed in all types of computers consistently. So a Macintosh or Linux user will be able to read the files in Bengali or Nepali just as easily he can read documents written in English.
Before you can start using Hindi or Bengali in Windows XP you will need to enable support for South Asian languages first. Here I will show you how to activate Bengali. The procedure is the same for the other supported Indian languages.
1. Go to Start-->Settings-->Control Panel-->Regional and Language Options
2. Click on the Languages tab on the top.
3. Under 'Supplemental language support' put a check mark against 'Install files for complex script and right to left languages (including Thai)' and click Ok. Windows might ask you to insert the installation CD to complete the process
4. Restart your computer. Do not forget to do this.
In the next step you have to set up your Indian language keyboard.
1. Go to Start-->Settings-->Control Panel-->Regional and Language Options
2. Click on the Languages tab on the top once more
3. Click on Details under 'Text services and input languages'
4. Under Installed Services menu click on Add.
5. Next under Input Language select Bengali (India)
6. Under Keyboard Layout/IME select Bengali (Inscript)
There is one small additional step so that it makes it easy for you to switch between English and the Indian language you have chosen.
1. In the Installed Services menu that you got to in Step 4 above you will find Preferences. Click on Language Bar. Here put a check mark against 'Show the Language bar on the desktop'. Also put a check mark against 'Show additional Language bar icons in the taskbar'. Click Ok till you exit the dialog boxes.
You are now set to type in Bengali in Notepad, Wordpad, Word and even in Outlook and Excel. To switch between English and your Indian language press Left Alt+Shift. You will see 'EN' or 'BN' ( for Bengali) on the lower right corner of your taskbar. This indicates which keyboard is active.
Now, of course, you will be wondering on the location of Bengali or Hindi characters on your new keyboard. In all standard Indian language keyboards the consonants are to the right and the vowels and dependent vowels on the left of the QWERTY keyboards. The dependent vowels are accessible by pressing Shift and the independent vowels can be got in the normal state.
The best way to figure out the keyboard is to enable the on-screen keyboard in Windows. To do this navigate to Start-->Programs-Accessories-->Accessibility and select On-Screen keyboard.
Now open a text editor like Notepad. Change your keyboard to your chosen Indian language. The change will be indicated in the taskbar on the lower right corner. Also, the On-Screen Keyboard will show you the layout of the language you have chosen. If it does not show up just take your mouse pointer to the on-screen keyboard and the change will be reflected. You can see the different positions of the characters in the normal state, and, by pressing Shift, you will be shown additional characters. Pressing Control and Alt together will show you more characters..
Different fonts
Here are the fonts that comes with Windows for the different Indian languages: You should use the Mangal font for Devanagari and Hindi. For Tamil use Latha. Use Tunga and Gautami to display Kannada and Telugu respectively. Shruti is for Gujarati and Raavi is for Gurumukhi. For Malayalam use Kartika. Finally, if you prefer Bengali use Vrinda.
Finally, for Bengali use Vrinda.
If you do not like these fonts you will find many more Unicode-enabled fonts for the Indian language of your choice on the Internet. The best part is that if you change fonts your document is still readable. That is a big relief.