Surya Namaskar is effective in loosening, massaging and toning all the joints, muscles and internal organs of the body. This set of asanas was not regarded as a part of Hatha yoga — it was added at a later time. Nonetheless, the Surya Namaskar is a complete sadhana (spiritual practice) in itself. It activates the production of the vital energy or life force in the body. It generates heat and aids in the purification of the physical body. Salutations to the sun balance the solar energy and bring about a state of harmony at both mental and physical levels.
The practice of Surya Namaskar consists of 12 postures. These postures have to be done one after another in a rhythmic and flowing manner. The postures also have a breathing pattern. The breathing pattern has to be maintained during the performance of the postures. The 12 postures are discussed below.
 |
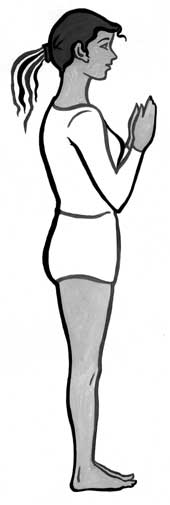
1. Pranamasana (prayer pose)
Stand upright with feet together. Fold the elbows and join the palms of the hands in front of the chest. Relax the whole body.
Breathing: Breathe normally.
Benefits: It brings about a state of concentration and calm.
 |
2. Hasta Utthanasana (raised arms pose)
Raise and stretch both the arms above the head. Bend the head, arms and upper trunk backwards.
Breathing: Inhale while raising arms.
Benefits: Stretches the abdominal organs and improves digestion, tones the lungs and spinal nerves, removes excess weight.
 |
3. Padahastasana (hand to foot pose)
Bend forward until the fingers or the palms touch the floor. Keep the knees straight. Try to touch the forehead with the knees. Do not strain.
Breathing: Exhale while bending forward.
Benefits: Eliminates or prevents abdominal problems, improves digestion, makes spine supple and tones spinal nerves.
 |
4. Ashwa Sanchalanasana (equestrian pose)
Place the palms of the hands flat on the floor beside the feet. Stretch the right leg as far as possible. In the final position the weight of the body will be on the both hands, the left foot, right knee and toes of the right foot.
Breathing: Inhale while stretching the leg backward.
Benefits: Massages the abdominal organs, strengthens the leg muscles and develops nervous balance.
 |
5. Parvatasana (mountain pose)
Take the left foot back beside the right foot. Simultaneously raise the buttocks and bring the head in between the arms. Try to keep the heels on the floor. Do not strain.
Breathing: Exhale while taking the leg backward.
Benefits: Strengthens the nerves and muscles of the arms and legs, tones the spinal nerves.
 |
6. Ashtanga Namaskar (salute with eight parts )
Lower the knees, chest and chin on the floor simultaneously. The buttocks, hips and abdomen should be raised.
Breathing: Hold the breath outside. There should be no respiration.
Benefits: Develops the chest muscles and exercises the region of the spine between the shoulderblades.
 |
7. Bhujangasana (cobra pose)
Lower hips and buttocks to the floor. Straightening the elbows, arch the back and push the chest forward into the cobra pose. Bend the head backward, the thighs and hips remain on the floor.
Breathing: Inhale while raising the torso and arching the back.
Benefits: Keeps the spine supple, improves circulation in the back region, tones spinal nerves, stimulates digestion, tones liver, massages kidneys and adrenal glands.
8. Parvatasana (mountain pose)
This stage is a repeat of position 5. From cobra pose assume mountain pose. The hands and feet do not move from position 7. Raise buttocks and lower the heels.
Breathing: Exhale while raising the buttocks.
9. Ashwa Sanchalasana (equestrian pose)
This stage is the same as position 4. Keep the palms on the floor. Bend the left leg and bring the left foot forward in between the hands. Lower the right knee. Tilt the head backward.
Breathing: Inhale while assuming the pose.
10. Padahastasana (head to foot pose)
This position is a repeat of pose 3. Bring the right foot forward next to the left foot. Straighten the knees. Bring the head as close to the knees as possible without straining.
Breathing: Exhale while performing the movement.
11. Hasta Utthanasana (raised arms pose)
This stage is the repeat of pose 2. Raise the torso and stretch the arms above the head. Bend the head, arms and upper trunk backward.
Breathing: Inhale while straightening the body.
12. Pranamasana (prayer pose)
This stage is the repeat of pose 1. Bring the palms together in front of the chest.
Breathing: Exhale while assuming the final position.
The 12 positions of the Surya Namaskar are to be practised twice to complete one round. Positions 1 to 12 constitute half a round. In the second half the positions are repeated with two little changes: a) in position 4, the left leg stretches backward; b) in position 9, bring the right foot in between the hands.
Conclusion: On the completion of each round, lower the arms to the sides, relax the whole body and concentrate on the breath until it becomes comfortable.
Contraindication: Not to be practised by people with high blood pressure, coronary artery disease, hernia, intestinal tuberculosis. Those with back pain should do it under guidance. Women should not practise it during menstruation,
Benefits: It stimulates and balances all the body systems. It prevents degeneration of the pineal gland and hypothalamus, makes rhythmic breath possible and supplies oxygenated blood to the brain. It is a good practice to bestow good health.
Surya Namaskar should be started with four to five rounds, increasing the rounds gradually. Follow this practice with a short relaxation in Shavasana.